Introduction
This guide provides instructions on how to set up 1) A Google Ads Account, and 2) Conversion Tracking for Google Ads.
Conversion tracking is Google’s method of detecting what actions people take on your website, and if they clicked through the Google Ad to get to your website. It is important to set this up to know how well your Google Ad campaigns perform.
If you have set up Google Ads already but are not sure what campaigns to implement, here are two guides on the must-have campaigns for two different business models, driving Ecommerce sales or Leads for services:
1) Create your Google Ads account
1. Navigate to the Google Ads homepage and press “Start Now”
Using Google Ads requires a Google Account. If you use Gmail, that means you already have a Google account so you can skip to the next step. If not, you’ll want to create a separate account for your business.
2. Enter your business name.
- It is recommended to press “Switch to Expert Mode” instead of going through the steps of filling in the business name, company website, Ad goals etc. “Expert Mode” may sound intimidating, but the layout is easy and the mode gives you more control over how you set up your Ad.

3. Press “Create an account without a campaign” to skip this step.
- It is important to create your account first, as you need to set up your conversions first before starting your campaign. Without this, Google won’t be able to accurately measure the performance of your Ad.
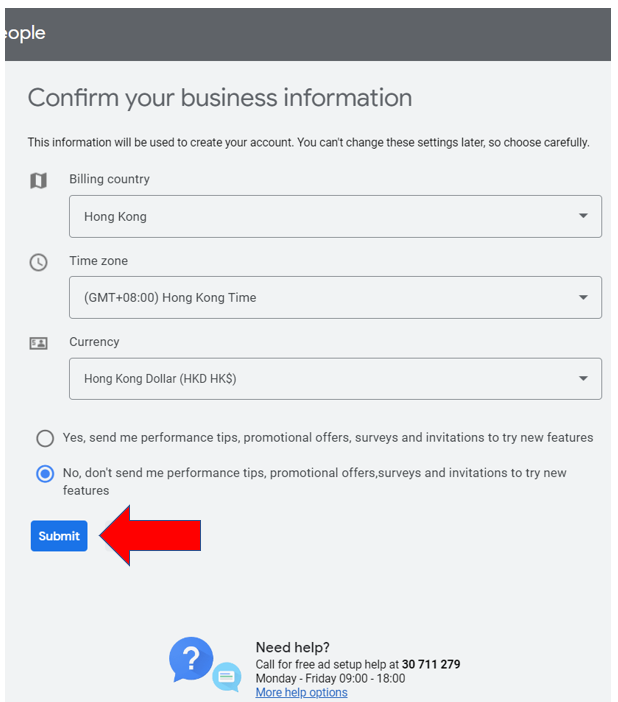
4. Confirm your billing information in terms of billing country, time zone, and currency.
5. Press “Explore your Account” to continue
6. Link up your Google Analytics Account by clicking “Tools & Settings” on the top right corner of the grey bar, and navigate to “Measurements > Google Analytics”
- Google Analytics is is a web analytics service offered by Google that tracks and reports website traffic, it lets you derive insights into your audience’s location, age, and behavior. It is a must-have for understanding your customers.
- Read our guide on using Google Analytics below to learn more:
That’s it! You have completed the first step of making your Google Ads account!
The next part of this toolkit will guide you in setting up “Conversion Tracking”, this is necessary to help Google track the performance of your Ads.
2) Set up Conversion tracking
As previously introduced, conversion tracking is Google’s method of detecting what actions people take on your website, and if they clicked through the Google Ad to get to your website.
Here’s an example: If you want to maximize product sales on your website, you would want to track the number of people who press the “Checkout” button. Doing so not only gives you transparency on how well an Advertisement is performing but also lets the Google Ads algorithm to prioritize people who “Checkout” on your website rather than people who are just browsing, allowing you to achieve your Advertisement goal of maximizing your sales.
Tip:
Keep in mind that there should be a conversion for the actions that you want to track on the website, e.g. booking an appointment, purchasing a product, submitting a contact form, etc.
To prevent setting up too many conversion actions, track the conversions that mean the most to you. For Ecommerce businesses, this will usually be the “Add to Cart” and “Checkout” actions, and for Lead-Generating businesses that will be “Book an Appointment” and “Submit a Contact Form”.
Before you can set up website conversion tracking you need:
- A website: This is where you’ll put the Google tag code.
- Ability to edit website code: Either you or your web developer will need to be able to add the code to your website.
1. Open the Google Ads Homepage and navigate to “Tools and Settings” and press Measurement > Conversions
2. Navigate to “New Conversion Action” and select “Website”
- For this demonstration, we will set up conversion tracking on the website to track what users do there.
3. Input your website URL and press “Scan” to let Google identify your website
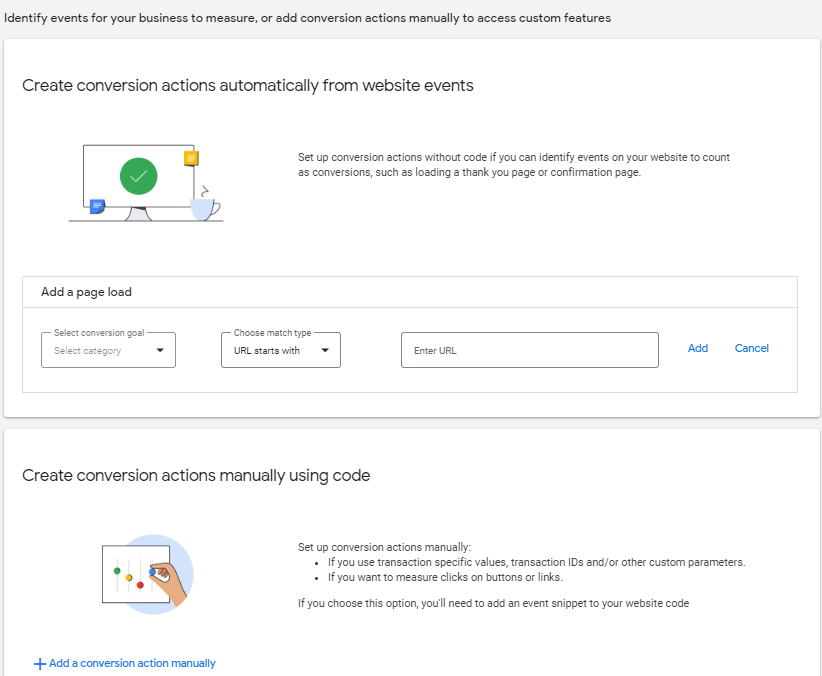
4. Select between “Automatic” or “Manual” Setup
- Automatic conversion tracking lets you measure the number of people that land on a specific website URL. For example, if your website has a booking form, you can link the “booking confirmation” webpage as a conversion. This is a simple way to get started as there is no code involved.
- Manual conversion tracking is more advanced and involves copying and pasting snippets of code that Google provides into your website. This gives greater flexibility as it can measure clicks into buttons and links, and assign different values to different actions – letting Google prioritize the actions you value more, e.g. you may sell items across a range of prices, and you would assign larger values to more expensive items.
5. Set up your Google Tag by pressing the “Set up” button
6. Lastly, enter your website URL and press “Scan”, selecting your website builder to install the Google Tag
- Google will generate a list of specific instructions depending on the website builder you use, e.g. WordPress, Wix, Squarespace…
That’s it! You are all set up and ready to launch your first Google Ad campaign!
To understand more about what Google Ads campaigns to set up as an Ecommerce or Lead-Gen business, click on the guides below!